How to Achieve the Perfect Ripped Jeans: Techniques and Tips
1. Choose the Right Pair of Jeans
Before starting, select a pair of jeans that are made of a durable fabric, such as denim. Stretchy or thinner fabrics may not hold up as well when distressed. Opt for a pair of jeans that fit comfortably and allow for ease in cutting and manipulating the fabric.
2. Mark the Rip Locations
To ensure symmetry and precision, mark the areas where you want the rips with a fabric chalk or a washable marker. Common spots include the knees, thighs, or the hips. Measure and align your marks to make sure the rips are consistent on both sides.
3. Use Scissors or a Knife for Clean Cuts
For a controlled and clean rip, use sharp scissors or a utility knife. Start by making small, controlled cuts where you’ve marked the spots. You can choose to make horizontal slashes or small V-shaped cuts depending on the look you want. For a rougher appearance, make the cuts irregular in size and shape.
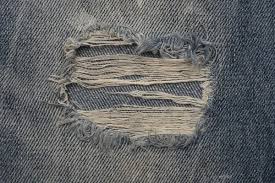
4. Distress the Edges
To make the rips look more authentic, you’ll want to distress the edges. Use a pair of tweezers or a seam ripper to pull at the edges of the cuts. This creates frayed, raw edges, giving the jeans a worn, lived-in look. You can also use sandpaper or a pumice stone to roughen up the fabric further.
5. Create Fraying with a Razor or Sandpaper
To add more fraying to the rips, rub the area with a razor blade or fine-grit sandpaper. This technique will help break down the denim fibers, making the rips appear more authentic and worn. Gently rub the edges of the cuts in a back-and-forth motion to create the perfect distressed texture.
6. Add Multiple Layers of Distressing
For a more dramatic effect, layer multiple rips on top of one another. Start with smaller slashes and add larger ones around them. You can even create small holes or tears in between the rips for an uneven, layered look. Be sure to balance out the distressing to maintain a cohesive design.
7. Wash and Dry for Final Touches
Once you’ve achieved the desired rips and distressing, wash and dry the jeans. The washing process will soften the fabric, enhance the fraying, and give the rips a more natural, broken-in appearance. You can even toss the jeans in the dryer to further distress the fabric and help the edges fray.
8. Optional: Add Personal Touches
For a unique look, consider adding personalized elements to your ripped jeans. You can use fabric paint, patches, or studs around the rips to give your jeans a customized feel. This adds individuality and a personalized flair to the final design.
9. Try on and Make Adjustments
Once you’ve completed the rips and distressing, try the jeans on to assess the fit and the look of the rips. If necessary, make adjustments, such as enlarging or repositioning the rips. Ensure that the overall look is balanced and cohesive.